When you zoom into a photo on your phone or computer, you’ll notice the individual pixels that form the image. Enlarge that same image for a billboard or scale it back for a business card, and it starts to look blurry or distorted. That’s the limitation of raster graphics.
Vector graphics work differently. Instead of pixels, they use defined paths that scale infinitely without losing clarity. Lines remain crisp, curves stay smooth, and edges don’t break apart. That scalability is why vectors are the professional standard for logos and embroidery, where clean outlines directly influence stitch precision and final quality.
When it comes to raster vs. vector graphics, the choice determines how well a design translates into thread. So, in this blog, we’ll delve into why digitizers convert raster to vector and how using vector files improves digitizing accuracy.
Let’s jump right in!
Quick Overview
- Raster images are pixel-based and blur when resized, making them hard to use for embroidery.
- Vector graphics use mathematically defined paths, keeping lines and shapes crisp at any size.
- Raster files blur, lose detail, and create inconsistent stitches, often requiring manual cleanup and slowing production.
- Vector artwork ensures accurate stitch paths, consistent density, and professional embroidery results.
- Converting raster to vector improves workflow efficiency, reduces errors, and delivers precise, scalable embroidery designs.
- Vector artwork is ideal for logos, text, line art, and designs that need resizing or multi-garment production.
- Vector files should be avoided for photorealistic images or designs with complex gradients.
How File Type Affects Embroidery Quality
Raster and vector files behave very differently when used in embroidery workflows. Raster images rely on pixels, which means their edges can become blurry or distorted when resized for different garment placements. Vector files, on the other hand, use defined paths that remain clean and scalable at any size.
Because embroidery machines follow structured stitch paths rather than pixels, file format plays a major role in how accurately a design can be translated into thread. If you’d like a deeper explanation of the difference between raster and vector graphics, you can explore our detailed guide covering how each format works.
Why Raster Files Cause Problems in Embroidery?
Raster graphics (JPG, PNG, BMP) comprise tiny pixels organized in rows and columns called grids. On screen or in print, these pixels create sharp images, but embroidery machines interpret artwork differently. They follow precise, mathematical, vector-based stitch patterns to form text and shapes.
When a raster image is enlarged to fit embroidery areas, the pixels stretch, edges distort, and the image loses clarity and becomes blurry. This makes the final design look uneven and messy, causing multiple issues during embroidery production.
Here’s what typically happens:
- Distorted or Blurry Stitches: When resized, a raster image becomes pixelated, forcing digitizers to “guess” where stitches should go, resulting in inaccurate, overlapping, or uneven threads.
- Loss of Fine Details: Enlarging a small, low-resolution raster artwork can create blurry, jagged edges. The machine cannot interpret these fuzzy outlines, leading to uneven or sloppy stitches.
- Complex Effects: Raster files contain gradients, shadows, and detailed textures that embroidery software struggles to translate, resulting in distorted, messy, or over-dense threads.
- Anti-aliasing Issues: Subtle color blends used to smooth edges on screens do not translate to thread, requiring manual cleanup, tracing, or recreation of the artwork.
- Over-processing of Files: Poor, low-resolution raster files cause digitizing software to generate excessive micro-stitches, resulting in thread breaks, fabric damage, and machine strain.
- Inconsistent Stitch Density: Scaling a raster image changes how tightly stitches are packed, producing distorted or inconsistent textures across diverse garment sizes.
- Production Delays: If the raster image needs to be used in different sizes, digitizers may have to manually reconstruct or clean up designs, adding time and labor costs while delaying production.
If you want to avoid blurry, distorted, or inconsistent stitches, converting your raster designs into vector artwork is the key. Our vector conversion service transforms your files into clean, scalable vectors, making embroidery precise and hassle-free.
Why Vector Files are the Preferred Choice for Embroidery?
Vector files (AI, EPS, SVG, PDF) are preferred for embroidery because they provide precise mathematical paths rather than pixels, allowing for infinite scaling for any garment size. This ensures crisp, clear lines and sharp edges for digitizing, resulting in clean stitch outlines, consistent color separation, and higher-quality, professional stitch patterns.
Here’s why digitizers prefer vector graphics over raster:
Infinite Scalability without Quality Loss
Since vector files are resolution-independent, resizing does not distort edges or blur fine lines. This means you can enlarge or scale back your artwork for caps, polos, backpacks, or even uniforms without losing quality or worrying about pixelation.
In embroidery, this unmatched flexibility prevents jagged outlines, collapsed lettering, and poor stitch density, ensuring your designs look clean, crisp, and on-point!
Precise Path Rendering for Digitizing
Every shape in a vector file contains defined anchor points and curves that represent exact boundaries. Digitizing software reads these paths to assign stitch types, such as satin, fill, or running stitches, leading to controlled stitch direction, cleaner edge transitions, and improved corner sharpness.
As a result, vector files reduce manual reconstruction and ensure your artwork looks sharp everywhere.
Cleaner Color Separation & Stitch Control
A vector file stores colors as mathematical data within solid, independent shape descriptions (path). This means there are no blended pixels or anti-aliased transitions, simplifying color separation and promoting clear thread sequencing.
Moreover, in embroidery digitizing, the file allows for proper underlay placement, reduced thread overlap, balanced fill distribution, and seamless workflow.
Improved Digitizing Efficiency
One of the most benefits of vector files is that they provide precise and clean lines, sharp edges, and flawless details. This eliminates manual cleanup and reconstruction, streamlining your embroidery workflow and improving turnaround times.
It also translates to fewer structural corrections, more predictable stitch simulations, and reduced risk of production revisions, promoting time and cost effectiveness.
Versatile, Editable, & Print-Ready
Vector files’ unmatched versatility mean you can edit shapes, colors, text, and proportions without losing quality. This empowers brands to update logos, adjust placement, or repurpose artwork while ensuring consistency.
What’s more, a single master file can support embroidery, screen printing, signage, and promotional materials without requiring reconstruction.
Strong, Memorable Brand Image
Unlike raster files, vectorized images do not become blurry or pixelated when stretched or compressed. This results in sharp outlines, uniform stitch density, and a consistently flawless design across all garments.
By ensuring clean, sharp, and professional artwork, vector graphics build stronger brand perception, improve brand memorability, and help you stand out from competitors. Thus, it comes as no surprise that vector files offer a stunning 96% first-time approval rate and significantly fewer quality issues.
Real-World Example: Raster vs. Vector in Embroidery
Over the years, we’ve helped multiple clients transform low-quality raster artwork into production-ready vector files for embroidery digitizing. While these images often look acceptable on screen, issues typically surface when we prepare for digitizing.
In most cases, the client-submitted artwork revealed issues such as:
- Blurry edges when enlarged
- Distorted or unreadable text
- Pixelated outlines
- Inconsistent shading
- Low-resolution compression artifacts
Since digitizing software follows defined paths, these issues directly affect stitch quality and final garment presentation. In raster (pixel-based) edges, the software has to approximate stitch direction instead of following a clean structural outline, causing uneven satin borders and inconsistent stitch direction along the curves.
So, instead of digitizing from the raster file, we begin with vector tracing, reconstructing the graphics in vector format. Each curve was redefined using precise paths, and spacing between elements was corrected to maintain stitch balance. Once digitized from the vector version, the embroidery produced clean outlines, smoother stitch transitions, and balanced density across multiple garment sizes.
Here’s what the transformation looks like in real-time:
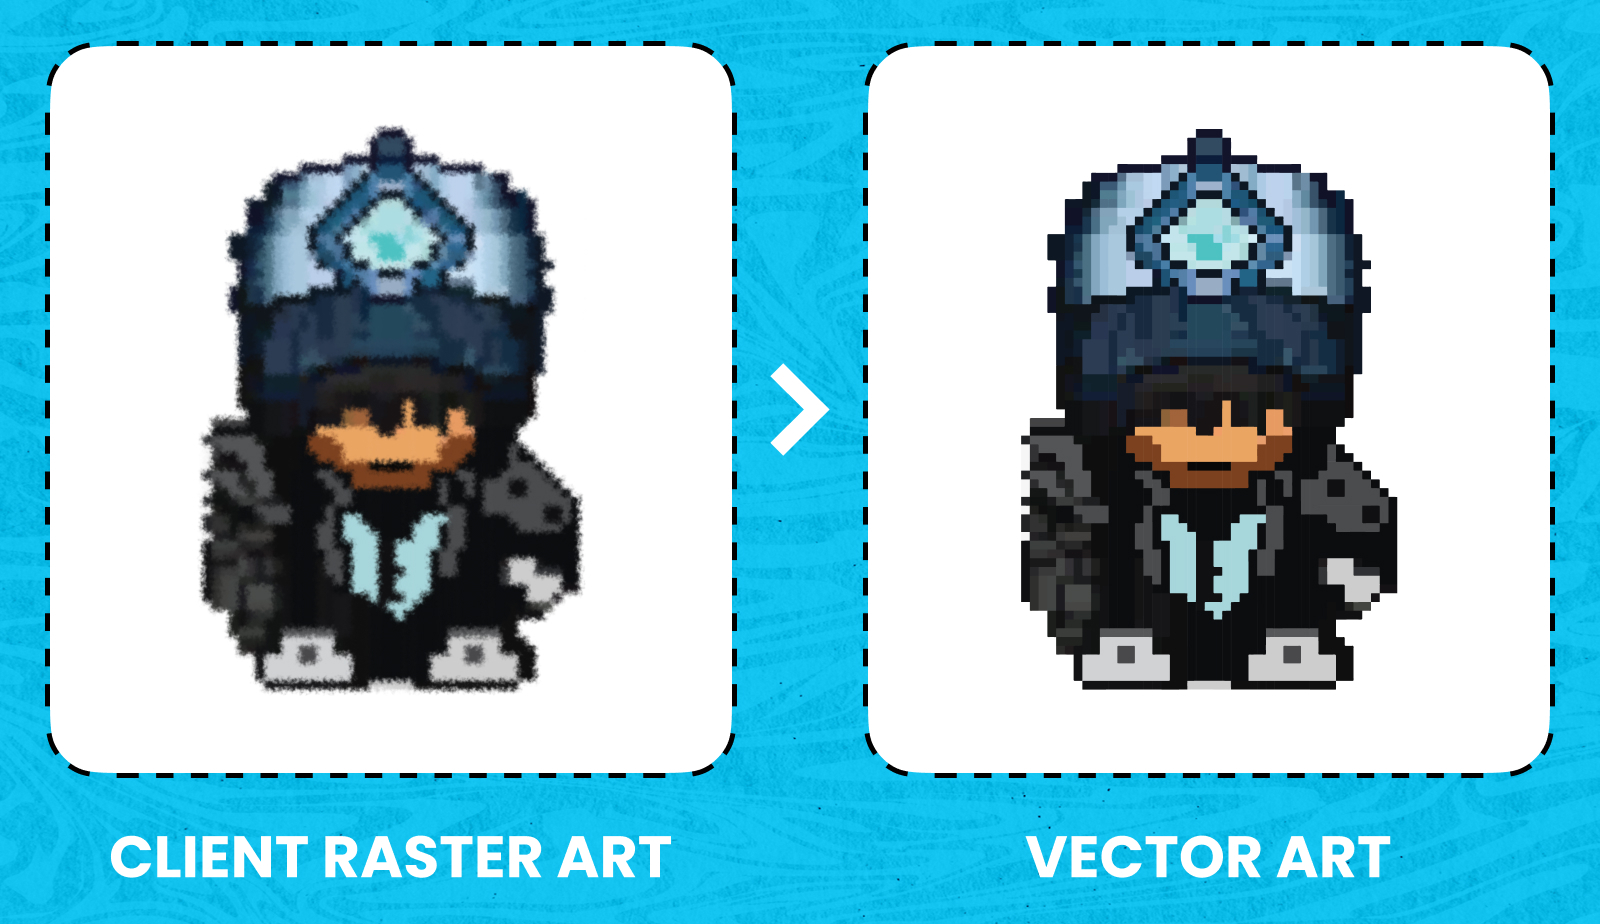

The difference isn’t just visual; vectorization strengthens stitch accuracy, reduces thread breaks and density issues, and guarantees production consistency, resulting in flawless, stitch-perfect embroidery every time.
Why is Vectorization Important in Embroidery Digitizing?
Vectorization is essential because it converts pixel-based, resolution-dependent (raster) artwork into clean, mathematical paths that digitizing software can accurately translate into stitch data. This precision allows for clear, high-resolution, and scalable designs that look sharp and stunning at any size.
Without a vectorized structure, embroidery files require manual reconstruction, increasing the risk of distorted edges and inconsistent stitch density. By converting raster images to vector, shape boundaries, curves, and color separations are clearly defined, ensuring precise stitch direction, underlay, and density.
The result? Cleaner outlines, smoother fills, fewer corrections, and more predictable production output, improving stitch quality and guaranteeing professional results.
When Should You Use Vector Artwork?
You should use vector artwork when your design requires scalability, precision, and consistent embroidery results. These files are ideal for:
- Line art and iconography
- Logo and brand marks
- Text-based designs
- Designs that require resizing
- Multi-garment production runs
- Commercial embroidery and repeat orders
Besides this, vector graphics are preferred in commercial embroidery, where small lettering, satin borders, accurate stitch control, and consistent stitch density are vital.
When Should You Not Use Vector Artwork
While there are many benefits of vector graphics, this file format has some limitations. You should avoid vector artwork when:
- The design is highly photorealistic
- The artwork mimics complex textures or artistic blending
- The image relies on complex gradients or realistic shading
- The artwork is needed for a specific, unchanging size
The Bottom Line
When comparing raster vs vector graphics for embroidery, the difference comes down to structure and scalability. While raster images are made of pixels, vector files use mathematically defined paths to create lines, shapes, and curves, ensuring clarity and sharp edges at any size.
Since embroidery machines follow precise, structured paths, vector artwork provides digitizers better control over stitch direction, density, underlay, and pull compensation. This reduces guesswork, improves digitizing efficiency, and ensures more consistent results on garments of all types.
Have a design that needs to stitch perfectly? Send it to us, and we’ll vectorize it for you, ensuring every line and detail comes out crisp and professional.
FAQs
1. What file formats are best for embroidery digitizing?
Vector files (AI, EPS, SVG) and digitizer output files (DST) are ideal for embroidery digitizing because they allow you to scale images infinitely without sacrificing quality.
2. What is the main advantage of a vector image?
The main advantage of a vector image is that it can be scaled infinitely without losing quality. Unlike pixel-based raster images, vectors use mathematically defined paths, keeping lines, curves, and edges crisp. This makes them ideal for embroidery, logos, text, and designs that require precise resizing.
3. What does vectorizing a raster do?
Vectorizing a raster converts pixel-based artwork into clean, scalable vector paths. This process defines precise lines, curves, and color blocks, eliminating blurriness and ensuring high-quality embroidery at any size.
4. What is the purpose of vector images in embroidery digitizing?
In embroidery digitizing, vector images provide clear outlines and precise paths, ensuring consistent stitch density, sharp edges, and professional results across all sizes.
5. Can you turn a raster into a vector?
Yes, you can convert raster images into vector files through vectorization. This process traces the artwork to create mathematically defined paths, producing scalable, editable vector files ideal for embroidery.